
A visualiser is a useful technology that can be used in the classroom by teachers to bring learning material to life.
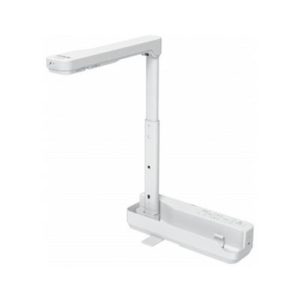
It has enormous potential for such a simple device. Effectively, a visualiser is nothing more than a camera on an arm that is height and tilt adjustable.
Its usefulness comes by way of its connectivity: visualisers can connect to almost any projector, interactive whiteboard or display (monitor, TV, tablet computer), and thus, they allow a recorded image to be shown in a variety of ways.
Visualisers are also portable and plug-and-play. 1kg (2.20lbs) is the typical weight for a visualiser, so moving a visualiser between classrooms is easy. All you need is a VGA or HDMI cable for the physical connection between two devices. Some visualisers also have Wi-Fi, so with newer devices with Wi-Fi no cables are needed at all.
Uses for visualisers
Here are some of the ways teachers are using visualisers in the classroom today:
- Displaying documents
- Displaying artwork
- Displaying delicate texts
- In place of photocopying
- Reading projects
- Live proofreading
- Live demos of science projects
- Zooming in on objects to show detail
- Displaying insects, leaves and animals
- Assisting visually impaired students with large text
- To watch students from behind during exams (yes, really!)
The main use case of visualisers in the classroom is to share documents with an entire classroom, so they can be seen from the front row to the back row. With a visualiser, you can blow up (increase) the relative size of material and display it in another location such as on an interactive whiteboard or school projector screen.
However, this is but the simplest use case.
A powerful feature of visualisers is their ability to zoom, allowing you to demonstrate the three-dimensional properties of an object in great detail. For example, you could zoom on volcanic rock to show the pits on the surface. This would be impossible if you were to stand at one end of a classroom with the rock in your hand.
Zooming isn’t the only useful feature of visualisers. An even more powerful feature is the image source itself: the camera. Because the camera sits on an arm that can tilt and swivel, it can be pitched in such a way that live demonstrations can be shown to a class. This all but eliminates the need for students to crowd around a table.
Powerful connectivity
By now, you know that visualisers can connect to most computer monitors, televisions, interactive displays and interactive whiteboards. All these secondary devices need is a VGA or HDMI port to connect to a visualiser.
In the last three years, newer visualisers have been released that can connect over Wi-Fi, and this small connectivity enhancement boosts the use cases because you can connect to other devices with Wi-Fi, such as smartphones and tablets. If you use tablets in the classroom, Wi-Fi visualisers enable you to live stream to these tablets, eliminating the need for your content to be shown on one centralised display.
Buying a visualiser for the classroom
We wrote an expert article covering this very topic. You can find it here – How to buy the right visualiser. In summary, there are two types of visualiser, two zoom types, and several resolutions. Please read our guide for an introduction to these.
Our advice for visualisers in the classroom is simple:
- Choose a visualiser with a CMOS camera so it can display still images AND capture video; cameras with a CCD sensor are for stills only.
- Choose a visualiser with a resolution of 1080p or 4K; the frame rate for video playback should be a minimum of 30 fps in Full HD.
- If you will be zooming in on objects, choose a visualiser with optical zoom (rather than just digital zoom) so there is no quality lost when you zoom.